Skip to content

Blog

Engineering approach

When I work on a project, small or large, this is the approach I like to take to designing and building a solution. This is written from the perspective of a new solution but could be adapted for existing solutions too.

High Level Design

The first place I start is a high level design. I don’t go into great detail or try to design a final system – I simply include the basic components I’ll need to get to something deliverable. This usually includes software components such as APIs (e.g. customers, orders, stock, etc…) and infrastructure (e.g. Kubernetes cluster, identity provider, secret storage, etc…). Sometimes specific technologies will be listed if these are known (e.g. if it’s an Azure house, then Azure Kubernetes Service (AKS), Entra ID and Azure Key Vault). This may be done as one diagram or two.

Breaking Up Work

I then take this high level design and think about the features and stories it will produce. Again, at this stage, nothing too detailed but thinking more about delivery of “something” even if it’s of no use.

As an example, let’s say we know we will be using AKS to host our application and have decided we will do this setup rather than look at container apps as a first stage. We’ve also decided we’ll be using a GitOps workflow (e.g. Flux) for deployments and, to start with, we want a simple API which has some kind of API key based access management. The initial requirements to get this API hosted and accessible might be:

  1. Set up repos for infra and API
  2. Create infrastructure*
  3. Create simple API
  4. Configure Flux
  5. Configure pipelines

* This first iteration may not be as secure or hardened as would be preferred but it’s nothing more than a first step with no data at risk.

Set up repos for infra and API

If Infrastructure-as-Code (IaC) is being used to manage your repos, simple add the two new repo names and you’re done. If still doing manually, add the appropriate repos after agreeing a naming convention. This is what I class as a sprint 0 story as it needs doing to unblock work on one or more other stories without creating (too many…) dependencies in a sprint. If running with a Kanban approach, this would be the first story to tackle.

Create infrastructure

Again, if an existing IaC setup is being used, this may be a very quick process. If not, infrastructure could be created manually or using something like Terraform. If time and skills permit, I’d opt for Terraform to ensure long-term consistency and it also makes it easier to iterate through changes as work progresses.

Remember that in this initial phase, only a single, small environment is required.

Create simple API

This is referring to nothing more than an API with a suitable set of stub endpoints. Nothing needs to be real in terms of real CRUD activities, etc… If helper libraries exist, it’s recommended these be used to simplify setup and ensure consistency. For example, this helper library could set up things like logging, basic health checks or config file loading.

As a strong advocate of Test Driven Development (TDD), I recommend starting with a TDD approach from the beginning, even for this “hello world” API.

Services should be build independently as possible and as loosely coupled as possible so it’s recommended any config, even that which will come from things like Azure Key Vault, reference local files and let Kubernetes manage this dependency. For databases such as SQL Server or Azure Storage, local Docker versions can be used, not that any of these should be needed for this first cut of the app.

Configure Flux

Flux is a GitOps tool and whilst isn’t strictly necessary for the first cut, without resorting to more complex pipelines and manual deployments, is a reasonable first step.

If you’re using a common and shared Helm chart for your services, that should significantly speed up the release of services as it will handle a lot of the boiler plate configuration and ensure consistency.

This initial Flux setup may want to include nothing but the ability to deploy an application using a Helm chart or could include broader requirements such as ingress. As things such as port forwarding can be used at these early stages, this may be required.

Pipelines

Hopefully a set of pipelines already exist in the form of templates that can be called with minimal parameters but, if not, this first pipeline should only do the basics of building and pushing an image to a container registry. If using Azure, Azure Container Registry (ACR) would be recommended for easier authentication.

It’s also highly recommended that a pull request pipeline be created at this time. Even when using trunk-based development, the process of going through a PR pipeline can ensure all tests are passing and security scans are successfully completed.

Potential Stories

This requirements above should lead to specific work items. These should be as small as possible (i.e. completable in no more than one day) whilst still delivering “something of value”. For example, say setting up the Terraform for new infrastructure will take 2-3 days based on previous experience, a single story for all this work would be undesirable. A better breakdown would be:

  1. Provision global resource group with ACR instance – this could include setting up the repo and storage account to hold the state
  2. Provision suitable Entra groups and grant appropriate access to ACR
  3. Provision AKS cluster and needed VNET
  4. Provision a service principal for use with pipelines
  5. Create pull request pipeline which runs a terraform plan and is called from the infrastructure repo
  6. Create a deploy pipeline which runs a terraform apply and is called on any merging to main
  7. Setup a repo for the Flux configuration and bootstrap the cluster using Terraform

Notice that this list encompasses parts of several of the initial high level tasks identified. At this very early stage, some dependencies on previous stories is to be expected.

It’s likely that existing resources (e.g. pipelines, code templates or libraries, etc…) exist which will make some of these tasks quite small.

Methodology

Before you start “doing stuff”, the work management approach needs to be considered. An agile approach would be an obvious in today’s world with Kanban and Scrum being the two more common approaches taken.

Scrum usually consists of work blocks (known as sprints) of 1 to 4 weeks with 2 weeks being the most common. Each sprint has a goal and collection of work to achieve that goal with some that “must” be completed, some that “should” be completed, some that “could” be completed if all goes to plan and some that “won’t” be completed unless work is completed much quicker than expected. This is called MoSCoW prioritising and is a typical method used. You’ll often see 1 to 4 used instead of MoSCoW but they often translate to the same basic understandings.

Kanban is more like a continuous list of work with the queue regularly reviewed, resulting in work being added, reprioritised and potentially removed.

Either approach supports trunk-based development with regular releases i.e. there’s no need to wait until the end of a sprint to do a release.

Story Writing

Once the approach has been agreed, the team (engineers, product owner, etc…) should agree on what stories are needed, write them, refine them and agree on a priority. Once enough work has been prepared for the first sprint or first week or two for Kanban, work can commence.

As time goes on, it’s good to have one or two sprints ahead (1-2 months of work) planned out. Things can always be reprioritised but this helps begin to see a bigger picture and set time expectations.

The Components

Once the first batch of stories have been written, work can commence. For the various areas of engineering, I endeavour to adhere to the following:

Infrastructure-as-Code (IaC)

All infrastructure should be done as IaC to ensure consistency and repeatability. My tool of choice is Terraform and whilst this tool isn’t perfect, it’s the most popular tool available and, as such, has a large amount of support available and works with many providers including Azure, AWS, GitHub, SonarCloud, etc…

If something is to be tested by manual changes, it is recommended that these changes are made in a separate area (e.g. subscription) to the infrastructure managed by IaC.

Code

All code should be written using a Test Driven Development (TDD) approach with tests testing requirements (i.e. inputs and outputs) rather than the inner workings of a method. Ultimately a series of unit, integration and end-to-end tests should be developed and executed as part of release pipelines.

Any code committed to main must be releasable to production. This doesn’t necessarily mean it can be used on production – a feature gate could be keeping it hidden – but the code should be safe to release to production.

The use of tools for static code analysis and Snyk can help scan code and containers for code or security issues ahead of any code being released to a server.

Logging, observability and monitoring are essential to keeping a system healthy and diagnosing problems when they arise. Suitable tooling should be in place such as Prometheus and Grafana or Datadog should be in place as early as possible in the development stage. The use of OpenTelemetry is strongly encouraged to enable easier migration to different tooling.

The observance of things like SOLID, DRY, KISS, etc… are always encouraged.

APIs and Microservices

When building microservices and APIs, I align to the following rules:

  1. Communication through interfaces – any communication, whether REST, gRPC or class, will communicate through interfaces and, for message-based/event driven applications, . agreed schema
  2. Any service must only communicate to another service or the data belonging to another service through the above interfaces – no service A looking at service B’s data . directly
  3. Any service must be independently deployable
  4. Any service should gracefully handle any unavailability of an external service
  5. Any API must be built to be externalisable (i.e. can be exposed to the public internet)
  6. Within a major version of an API, any changes should be non-breaking – when breaking changes are needed, a new major version should be created and the previous version(s) maintained

Separation of Concerns

It is strongly recommended that, where possible, things such as authentication, configuration, credentials, etc… are managed independently of the code. In other words, an application running locally should use local configuration files to store non-sensitive configuration (e.g. a connection to a local SQL Server instance is OK but nothing that is hosted). If sensitive values must be stored, use things like User Secrets as these aren’t part of the repo and therefore not stored in source control.

For loading sensitive values, where possible use managed identities (or equivalents) and, where these aren’t possible, try to use (service) accounts that are machine created (likely with IaC) and their credentials stored in things like Key Vault and never actually accessed/known by humans. These credentials along with other configuration values can then be made available to applications (i.e. pods) in Kubernetes using tools like External Secrets Operator and Azure App Configuration Provider and mounting them as files into the pod. Equally, storage can be mounted in a similar manner.

Putting It All Together

Work should be selected from the top of the queue with a goal to complete active stories (or bugs once they come in) before picking up new ones. In other words, pull requests should be given priority and then, before picking up a new story, see if you can potentially assist on an already active story.

When is it done?

It’s important to have a clear definition of done so that all parties agree what this means. As a minimum, it should mean a story has successfully completed a pull request to main but arguably it should mean, as a minimum, QA (either automated or manual) has been completed. I would suggest something is only “done” once it has been successfully deployed to production and confirmed to be working.
Istio and JWT authentication

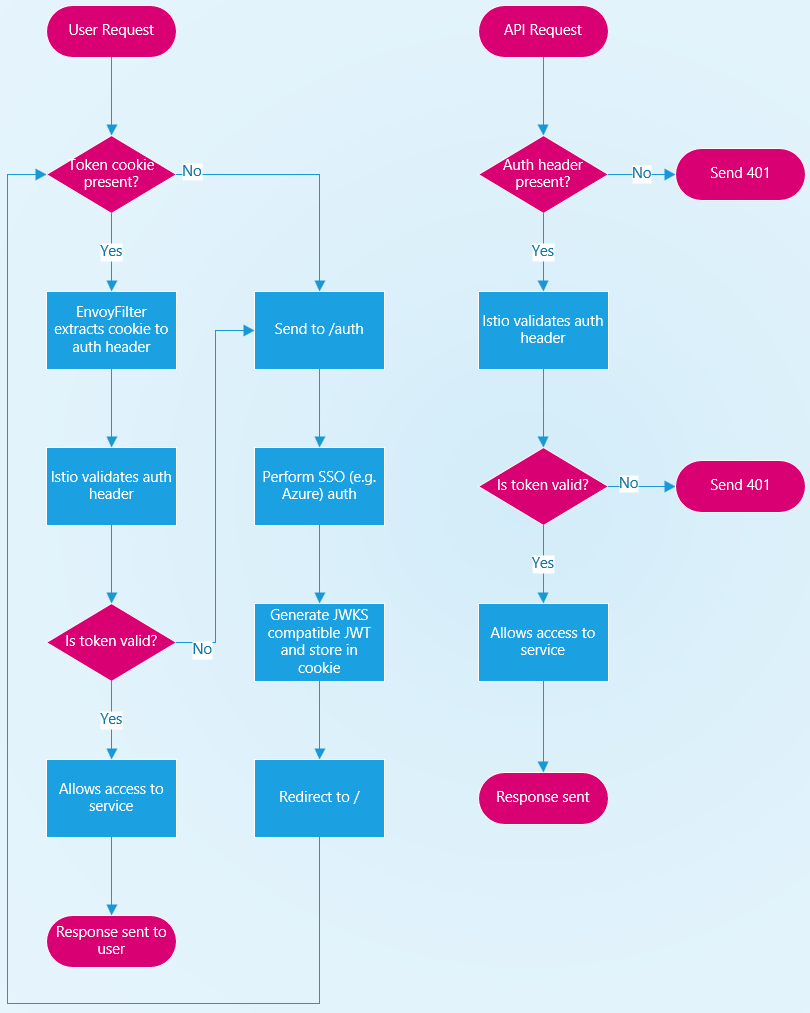
I’ve been looking at a workflow which allow the JWT authentication in Istio to be used for both UI and API requests. The basic idea is to make use of Istio’s JWT authentication mechanism to control initial access and then use an authorization policy to control access to specific services.

The diagram below shows the basic workflow of how this will work. It has been simplified by removing things like refresh tokens or authorization policies.

Flow chart showing JWT flow

The basic idea is that once the basic auth is done to a 3rd party service such as Azure AD/Entra ID or Google Workspace, a signed token is generated and stored in a cookie. This cookie value is then used for further auth requests. For APIs, the cookie value can be used directly and passed to any API calls. For UIs, because Istio can’t currently extract tokens from, an Envoy Filter is used. This looks for a specific cookie and copies the value to the authentication header before forwarding the request to Istio’s authentication handler.

If the token is valid (signed by a known private key and hasn’t expired), traffic is allowed to pass (subject to authorization policies) or rejected. On unauthorised requests, APIs just respond as unauthorised where as the UI redirects to the /auth page.

Creating a simple Kubernetes operator in .NET (C#)

Note: I'd recommend building a Kubernetes operator using Go as it is the language of choice for Kubernetes. This article is more of a proof of concept.

Creating a Kubernetes operator can seem a bit overwhelming at first. To help, there’s a simple NuGet package called CanSupportMe.Operator which can be as simple as watching for a secret or config map or creating a custom resource definition (CRD) and watching that. You then get call backs for new items, modified items, reconciling items, deleting items and deleted items. (* CRDs only)

The call backs also expose a data object manager which lets you do things like create secrets and config maps, force the reconciliation of an object, clear all finalizers and check if a resource exists.

Example

The follow is a console application with the following packages installed:

dotnet add package Microsoft.Extensions.Configuration.Abstractions
dotnet add package Microsoft.Extensions.Hosting
dotnet add package Microsoft.Extensions.Hosting.Abstractions
dotnet add package CanSupportMe.Operator

If you’re not use a context with a token in your KUBECONFIG, use the commented out failover token lines to specify one (how to generate one is on the NuGet package page).

using CanSupportMe.Operator.Extensions;
using CanSupportMe.Operator.Models;
using CanSupportMe.Operator.Options;
using Microsoft.Extensions.Hosting;

// const string FAILOVER_TOKEN = "<YOUR_TOKEN_GOES_HERE>";

try
{  
  Console.WriteLine("Application starting up");

  IHost host = Host.CreateDefaultBuilder(args)
    .ConfigureServices((context, services) =>
    {
      services.AddOperator(options =>
      {
        options.Group = "";
        options.Kind = "Secret";
        options.Version = "v1";
        options.Plural = "secrets";
        options.Scope = ResourceScope.Namespaced;
        options.LabelFilters.Add("app.kubernetes.io/managed-by", "DemoOperator");

        options.OnAdded = (kind, name, @namespace, item, dataObjectManager) =>
        {
          var typedItem = (KubernetesSecret)item;

          Console.WriteLine($"On {kind} Add: {name} to {@namespace} which is of type {typedItem.Type} with {typedItem.Data?.Count} item(s)");
        };

        options.FailoverToken = FAILOVER_TOKEN;
      });
    })
    .Build();

  host.Run();
}
catch (Exception ex)
{
  Console.WriteLine($"Application start failed because {ex.Message}");
}

To create a secret that will trigger the OnAdded call back, create a file called secret.yaml with the following contents:

apiVersion: v1
kind: Secret
metadata:
  name: test-secret-with-label
  namespace: default
  labels:
    app.kubernetes.io/managed-by: DemoOperator
stringData:
  notImportant: SomeValue
type: Opaque

Then apply it to your Kubernetes cluster using the following command:

kubectl apply -f secret.yaml

This should result in the following being output to the console:

On Secret Add: test-secret-with-label to default which is of type Opaque with 1 item(s)

My deployment to Azure using Terraform and Flux

To deploy my needed infrastructure and applications to Azure, I use a combination of Terraform and Flux, all running from GitHub Actions workflows. This is only a high level overview and some details have been excluded or skimmed over for brevity.

Terraform

For me, one of the biggest limitations of Terraform is how bad it is at DRY (i.e. Don’t Repeat Yourself). I wanted to maintain a pure Terraform solution whilst trying to minimise the repetition but also allow the easy spinning up of new clusters as needed. I also knew I needed a “global” environment as well as various deployment environments but, for now, development and production will suffice.

Modules

Each Terraform modules is in it’s own repo with a gitinfo.txt file specifying the version of the module. On merge to main, a pipeline runs which tags the commit with Major, Major.Minor and Major.Minor.Patch tags so that the modules can be specifically pinned or, if desired, a broader level of pinning can be used.

Folder Structure

Each module contains a src folder which contains an examples folder for Terraform examples of the modules being used and a module folder which contains the actual module. This will be then referenced by the scope repos.

Scopes

Three scope repos are in use – Environment, Global and GitHub – which make use of the above modules and standard Terraform resources.

Global and GitHub are single use scopes and are only utilised once and configure all global resources (e.g. DNS zones) and all GitHub repositories. The latter holds configuration for all repositories in GitHub including it’s own. The initial application of this, to get round the chicken and egg problem, will be covered in another article.

The environment scope is used to configure all environments and within each environment scope, there are regions and within them are farms and within them are clusters. This allows for common resources to be placed at the appropriate level.

Folder Structure

Each scope contains a src folder which contains three sub folders:

  • collection – This contains the resources to be applied to the scope
  • config – This contains one or more tfvars files which, especially in the case of environments, contain the different configuration to be applied to each environment
  • scope – This is the starting point of a scope and it what is referenced by the plan and apply pipelines – it should only contain a single reference to the module in ../collection

Data Between Scopes

To pass data between scopes, the pipelines create secrets within GitHub which can then be referenced by other pipelines and passed to the target scope. The main example of this is the global scope needs to pass data, e.g. DNS details, to the environments.

Variables in Environment Scope

To aid with data passing between layers within the environment, a few variables have been set up which get passed through the layers and can have data added as they pass down the chain. These variables are defaults, created_infrastructure and credentials. As an example, when an environment level key vault is created, it’s ID and name are added to created_infrastructure so that access can be set up for the AKS cluster using a managed identity.

Flux

Bootstrapping

When a cluster is provisioned, it is automatically given a cluster folder in the Flux repo and has a cluster_variables secret created to store values that either Flux or Helm charts being applied by Flux may need including things like the region or global key vault’s name.

Folder Structure

The top level folder is the clusters folder and it contains a _template folder along with a folder per environment. The individual environment folders then contain a folder for the region, the farm, and finally the cluster (e.g. development/uksouth/f01/c01). The c01 folder is based on the _template folder.

The remaining folders are applications, clients, infrastructure, redirects and services with each of these being referenced from the c01 folder.

The infrastructure folder contains setup manifests and Helm releases for things like Istio, External DNS or External Secrets Operator.

The redirects folder is split up by environment and defines any redirects which should be added for that environment. These are managed using a redirects Helm chart and a series of values passed to its HelmRelease object.

The services folder allows you to define services which should be deployed at the various levels of global, environmental, regional, farm or cluster level. There is a definitions folder containing the base definition for each service.

The applications folder defines applications which should be deployed to specific clusters and, as with services, there is a definitions folder which contains the default configuration. These are generally non-targeted applications such as a commercial landing page.

The final folder is clients which contains a definition for any client applications. It’s quite likely this folder may only contain a single definition if only a single SaaS application (note this is single application, not single microservice) exists. There are then the usual nested environment, region, farm and cluster folders with each cluster defining the clients that are deployed to that specific instance.

The NuGet Packages I Use

This article is simply a list of the common NuGet packages I use. This list should be viewed as a “this is what I do” list rather than a recommendation. This isn’t an exhaustive list and will be updated over time. For example, a few months ago I switched from Moq to NSubstitute. Please note that some of the packages are mine.

Development

  • DateTimeProvider
  • FluentResults
  • Serilog.AspNetCore
  • Serilog.Enrichers.Environment
  • Serilog.Enrichers.Thread
  • Serilog.Extras
  • Serilog.Settings.Configuration
  • Serilog.SInks.Seq
  • System.IO.Abstractions
  • Throw

Testing

  • bUnit
  • FluentAssertions
  • NSubstitute

Create a Signed JWT and validate it in Istio using a JWK

This guide shows how to create a public/private key pair and how to use these to create a JWK and a signed JWT and then validate a request to a service running in Kubernetes where Istio is running.

Generate a Public/Private Key Pair

For this you’ll need openssl installed. If you have Chocolatey installed, choco install openssl -y will do the job.

Run the following commands:

ssh-keygen -t rsa -b 4096 -m PEM -f jwtRS256.key
# Don't add passphrase
openssl rsa -in jwtRS256.key -pubout -outform PEM -out jwtRS256.key.pub

This produces a .key file containing the private key and a .key.pub file containing the public key.

Create JWK from Public Key

Go to the JWK Creator site and paste in the contents of your public key. For purpose, choose Signing and for the algorithm, choose RS256.

Manifests

The following will secure all workloads where they have a label of type and a value of api so they must have a JWT and it must be valid.

apiVersion: security.istio.io/v1
kind: RequestAuthentication
metadata:
  name: "validate-jwt"
  namespace: istio-system
spec:
  selector:
    matchLabels:
      type: api
  jwtRules:
  - issuer: "testing@secure.istio.io"
    jwks: |
      {
        "keys": [
          <YOUR_JWK_GOES_HERE>
        ]
      }

---

apiVersion: security.istio.io/v1
kind: AuthorizationPolicy
metadata:
  name: "deny-requests-without-jwt"
  namespace: istio-system
spec:
  selector:
    matchLabels:
      type: api
  action: DENY
  rules:
  - from:
    - source:
        notRequestPrincipals: ["*"]

Replace <YOUR_JWK_GOES_HERE> with your JWK created in the previous step. Make sure your indentation doesn’t go to less than the existing { below the jwks: | line.

Create a Test JWT

The following PowerShell script will create a JWT that will last 3 hours and print it to the screen.

Clear-Host

# Install-Module jwtPS -force

Import-Module -Name jwtPS

$encryption = [jwtTypes+encryption]::SHA256
$algorithm = [jwtTypes+algorithm]::HMAC
$alg = [jwtTypes+cryptographyType]::new($algorithm, $encryption)

$key = "jwtRS256.key"
# The content must be joined otherwise you would have a string array.
$keyContent = (Get-Content -Path $key) -join ""
$payload = @{
    aud = "jwtPS"        
    iss = "testing@secure.istio.io"
    sub = "testing@secure.istio.io"
    nbf = 0
    groups = @(
      "group1",
      "group2"    
    )
    exp = ([System.DateTimeOffset]::Now.AddHours(3)).ToUnixTimeSeconds()
    iat = ([System.DateTimeOffset]::Now).ToUnixTimeSeconds()
    jti = [guid]::NewGuid()
}
$encryption = [jwtTypes+encryption]::SHA256
$algorithm = [jwtTypes+algorithm]::RSA
$alg = [jwtTypes+cryptographyType]::new($algorithm, $encryption)
$jwt = New-JWT -Payload $payload -Algorithm $alg -Secret $keyContent

Write-Host $jwt

Note that you will likely need to run the line Install-Module jwtPS -force in an elevated prompt.

Testing

To test this, you will need a service you can point at in your cluster with a label of type set to api. Don’t forget to update URLs as needed.

$TOKEN = jwt_from_previous_script
curl https://example.com/api/v1/test
curl --header "Authorization: Bearer $TOKEN" https://example.com/api/v1/test

In the above examples, the first request should return 401 and the second request should return 200.

Setting up an Arrange, Act, Assert comment template in Visual Studio 2022

To add a simple code snippet that allows a set of arrange, act and assert comments to be inserted using the short code of aaa, firstly, create a simple XML file with the following contents and save it as ArrangeActAssert.snippet:

<?xml version="1.0" encoding="utf-8"?>
<CodeSnippets xmlns="http://schemas.microsoft.com/VisualStudio/2005/CodeSnippet" xmlns:xsi="http://www.w3.org/2001/XMLSchema-instance">
    <CodeSnippet Format="1.0.0">
        <Header>
            <Title>Arrange Act Assert</Title>
            <Author>Neil Docherty</Author>
            <Description>Adds an arrange, act, assert to a test</Description>
            <HelpUrl />
            <Keywords />
            <SnippetTypes />
            <Shortcut>aaa</Shortcut>
        </Header>
        <Snippet>
            <Declarations />
            <References />
            <Code Kind="any" Language="CSharp"><![CDATA[// Arrange
$end$

// Act


// Assert]]></Code>
        </Snippet>
    </CodeSnippet>
</CodeSnippets>

Then, to import it into Visual Studio, perform the following steps:

  1. Go to the Tools menu
  2. Select Code Snippets Manager
  3. Choose the Import button and locate and select your ArrangeActAssert.snippet file and click Open.

Now, when editing some C# code, typing aaa and hitting tab twice will create a block of text similar to:

// Arrange


// Act


// Assert

HTTP Client Factory (IHttpClientFactory) mock using NSubstitute

Following the controversy around Moq, I decided to look into using NSubstitute as an alternative mocking library.

The example below is an NSubstitute version of the class created as part of my C# TDD blog article. The only change in functionality is the optional passing in of an HTTP status code.

public static IHttpClientFactory GetStringClient(string returnValue, HttpStatusCode returnStatusCode = HttpStatusCode.OK)
{
    var httpMessageHandler = Substitute.For<HttpMessageHandler>();
    var httpClientFactory = Substitute.For<IHttpClientFactory>();

    httpMessageHandler
        .GetType()
        .GetMethod("SendAsync", BindingFlags.NonPublic | BindingFlags.Instance)
        .Invoke(httpMessageHandler, new object[] { Arg.Any<HttpRequestMessage>(), Arg.Any<CancellationToken>() })
        .Returns(Task.FromResult(new HttpResponseMessage(returnStatusCode) { Content = new StringContent(returnValue) }));

    HttpClient httpClient = new(httpMessageHandler);
    httpClientFactory.CreateClient(Arg.Any<string>()).Returns(httpClient);

    return httpClientFactory;
}

Changing branch used by Flux deployment

If the need arises to change the branch used by a Flux installation, this can be done without bootstrapping the cluster again. Not that this is recommended only on similar setups (e.g. you’re trying out a new change on a dev cluster and want to point to your dev branch which is based on the default branch).

Components

This article assumes the following components are in play:

  • Kubernetes cluster called cluster01
  • Flux mono repo with the cluster definition in the locations clusters/development (this folder contains the flux-system folder)
  • A default branch called main
  • A working branch called 12345-something-to-test that is based on main with a new change in it

Process

  1. Switch to your working branch
  2. Run the following command at a shell prompt (Bash, PowerShell, etc…) when the current context is you the target cluster: flux suspend source git flux-system
  3. Update clusters/development/flux-system/gotk-sync.yaml to set the value of branch to 12345-something-to-test and commit and push it
  4. Within your Kubernetes cluster, update the resource of type GitRepository named flux-system in the flux-system namespace so the branch field is also 12345-something-to-test
  5. Run the following command at a shell prompt (Bash, PowerShell, etc…) when the current context is you the target cluster: flux resume source git flux-system

Once testing is complete, repeat the above process but setting the branch back to main.

.NET Container Running as Non-Root in Kubernetes

This is a quick guide on how to get a standard .NET container running as a non-root, non privileged user in Kubernetes. It is not a complete security guide but rather just enough if you require your pods to not run under root.

Update Dockerfile

The first step is to update the Dockerfile. Two changes are required here; one to change the port and one to specify the user to use.

Exported Port

At the start of the Dockerfile, replace any EXPORT statements with the following:

ENV ASPNETCORE_URLS http://+:8000
EXPOSE 8000

This will expose your application to the cluster on port 8000 rather than port 80.

User

Next, just before the ENTRYPOINT instruction, add the following line:

USER $APP_UID

Now build and push the container to your container registry of choice either manually or via a CI/CD pipeline.

Kubernetes Manifests

Deployment Manifest

Add the following snippet to the deployment manifest under the container entry that is to be locked down:

securityContext:
  allowPrivilegeEscalation: false
  runAsNonRoot: true
  runAsUser: 1654

Service Manifest

As the exported container port has now changed, update any service you may have defined so it looks similar to the following service manifest:

apiVersion: v1
kind: Service
metadata:
  name: your-service
  namespace: service-namespace
spec:
  selector:
     app: your-app
  ports:
    - name: http
      port: 80
      targetPort: 8000
  type: ClusterIP

The pod will still be accessible via its service on port 80 so things like ingress or gateway definitions or references from other apps do not need to be updated.